> ## Documentation Index
> Fetch the complete documentation index at: https://dripart-docs-wan3-30off-promo.mintlify.site/llms.txt
> Use this file to discover all available pages before exploring further.
# Qwen-Image-Layered ComfyUI 工作流示例
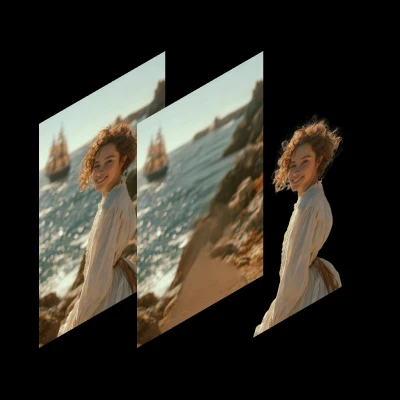
> Qwen-Image-Layered 是一个能够将图像分解为多个 RGBA 图层的模型,通过图层分解实现固有的可编辑性。
**Qwen-Image-Layered** 是阿里巴巴通义千问团队开发的模型,能够将图像分解为多个 RGBA 图层。这种分层表示解锁了固有的可编辑性:每个图层都可以独立操作而不影响其他内容。
**主要特性**:
* **固有可编辑性**:每个图层都可以独立操作而不影响其他内容
* **高保真基础操作**:支持调整大小、重新定位和重新着色,语义组件物理隔离
* **可变图层分解**:不限于固定数量的图层 - 可根据需要分解为 3、4、8 或更多图层
* **递归分解**:任何图层都可以进一步分解,实现无限分解深度
**相关链接**:
* [Hugging Face](https://huggingface.co/Qwen/Qwen-Image-Layered)
* [研究论文](https://arxiv.org/abs/2512.15603)
* [博客](https://qwenlm.github.io/blog/qwen-image-layered/)
## Qwen-Image-Layered 工作流
请确保你的 ComfyUI 已经更新。
* [ComfyUI 下载](https://www.comfy.org/download)
* [ComfyUI 更新教程](/zh/installation/update_comfyui)
本指南里的工作流可以在[工作流模板](/zh/interface/features/template)中找到。如果找不到,可能是 ComfyUI 没有更新。
如果加载工作流时有节点缺失,可能原因有:
1. 你用的不是最新版(每夜版)。
2. 启动时有些节点导入失败。
* [Cloud](https://cloud.comfy.org) 会在 ComfyUI 稳定版本发布后更新。
所以,如果你发现本文档中有任何核心节点缺失,可能是因为新核心节点尚未在最新稳定版中发布。请等待下一个稳定版发布。
Qwen-Image-Layered 分解
将图像分解为可编辑的 RGBA 图层,用于重新着色、替换、调整大小和重新定位等工作流。
 下载 JSON 工作流文件
零配置在线运行 ComfyUI
**输入材料**
将此文件上传到 `LoadImage` 节点 **74**:
`LoadImage` 节点 74 · `coastal_smiling_woman.png`

## 模型下载
**text\_encoders**
* [qwen\_2.5\_vl\_7b\_fp8\_scaled.safetensors](https://huggingface.co/Comfy-Org/HunyuanVideo_1.5_repackaged/resolve/main/split_files/text_encoders/qwen_2.5_vl_7b_fp8_scaled.safetensors)
**diffusion\_models**
* [qwen\_image\_layered\_bf16.safetensors](https://huggingface.co/Comfy-Org/Qwen-Image-Layered_ComfyUI/resolve/main/split_files/diffusion_models/qwen_image_layered_bf16.safetensors)
**vae**
* [qwen\_image\_layered\_vae.safetensors](https://huggingface.co/Comfy-Org/Qwen-Image-Layered_ComfyUI/resolve/main/split_files/vae/qwen_image_layered_vae.safetensors)
**模型保存位置**
```
📂 ComfyUI/
├── 📂 models/
│ ├── 📂 text_encoders/
│ │ └── qwen_2.5_vl_7b_fp8_scaled.safetensors
│ ├── 📂 diffusion_models/
│ │ └── qwen_image_layered_bf16.safetensors
│ └── 📂 vae/
│ └── qwen_image_layered_vae.safetensors
```
## FP8 版本
默认使用 bf16,需要较高显存。如需降低显存使用,可以使用 fp8 版本:
* [qwen\_image\_layered\_fp8mixed.safetensors](https://huggingface.co/Comfy-Org/Qwen-Image-Layered_ComfyUI/blob/main/split_files/diffusion_models/qwen_image_layered_fp8mixed.safetensors)
然后更新[子图](/zh/interface/features/subgraph)中的 **Load Diffusion model** 节点来使用它。
## 图层和输出
图层数量由[子图](/zh/interface/features/subgraph)内 **Empty Qwen Image Layered Latent** 节点上的 `layers` 组件设置。
该模型会在生成图层的同时重新生成完整图像,因此一次生成总是解码出 `layers + 1` 张图像:
| `layers` | 解码出的图像数 | 内容 |
| ---------- | ------- | -------------- |
| `0` | 1 | 仅完整图像 |
| `2`(模板默认值) | 3 | 完整图像,然后是 2 个图层 |
| `5` | 6 | 完整图像,然后是 5 个图层 |
**第一张图像是完整图像,而不是图层。** 在图像转图层的工作流中,它重现的是输入图像,因此当你只需要图层时应将其丢弃。`layers` 可以设为 `0`,此时只会得到这一张图像。
**将所有图层合成回去可以重建完整图像。** 可以用它来检查:如果堆叠图层无法重现第一张图像,说明分解没有达到预期效果。
### 图层如何变成单独的图像
**Empty Qwen Image Layered Latent** 节点会分配一个形状为 `[batch_size, 16, layers + 1, height // 8, width // 8]` 的 5D Latent。图层位于第三个轴上,也就是视频模型用于存放帧的那个时间轴。将 **LatentCutToBatch** 节点的 `dim` 设置为 `t`,会把该轴移动到批次维度上,因此在 **VAE Decode** 之后,每个图层都是批次中一张单独的图像。
因此,图层在堆栈中的位置就是它在批次中的索引,从索引 0 处的完整图像开始计数。这里没有 z-index 字段,也没有承载该顺序的逐图层元数据,因此重新排序或过滤批次就等于重新排序图层。
Qwen-Image-Layered VAE 解码为 4 个通道,因此解码出的图层带有 Alpha 通道。
## 工作流设置
### 采样器设置
该模型运行较慢。原始采样设置为 steps: 50 和 CFG: 4.0,这将至少使生成时间翻倍。
### 输入尺寸
输入尺寸建议使用 640px。如需高分辨率输出,请使用 1024px。
### 提示词(可选)
文本提示词用于描述输入图像的整体内容——包括可能被部分遮挡的元素(例如,你可以指定隐藏在前景物体后面的文字)。它不是用来明确控制各个图层的语义内容的。
下载 JSON 工作流文件
零配置在线运行 ComfyUI
**输入材料**
将此文件上传到 `LoadImage` 节点 **74**:
`LoadImage` 节点 74 · `coastal_smiling_woman.png`

## 模型下载
**text\_encoders**
* [qwen\_2.5\_vl\_7b\_fp8\_scaled.safetensors](https://huggingface.co/Comfy-Org/HunyuanVideo_1.5_repackaged/resolve/main/split_files/text_encoders/qwen_2.5_vl_7b_fp8_scaled.safetensors)
**diffusion\_models**
* [qwen\_image\_layered\_bf16.safetensors](https://huggingface.co/Comfy-Org/Qwen-Image-Layered_ComfyUI/resolve/main/split_files/diffusion_models/qwen_image_layered_bf16.safetensors)
**vae**
* [qwen\_image\_layered\_vae.safetensors](https://huggingface.co/Comfy-Org/Qwen-Image-Layered_ComfyUI/resolve/main/split_files/vae/qwen_image_layered_vae.safetensors)
**模型保存位置**
```
📂 ComfyUI/
├── 📂 models/
│ ├── 📂 text_encoders/
│ │ └── qwen_2.5_vl_7b_fp8_scaled.safetensors
│ ├── 📂 diffusion_models/
│ │ └── qwen_image_layered_bf16.safetensors
│ └── 📂 vae/
│ └── qwen_image_layered_vae.safetensors
```
## FP8 版本
默认使用 bf16,需要较高显存。如需降低显存使用,可以使用 fp8 版本:
* [qwen\_image\_layered\_fp8mixed.safetensors](https://huggingface.co/Comfy-Org/Qwen-Image-Layered_ComfyUI/blob/main/split_files/diffusion_models/qwen_image_layered_fp8mixed.safetensors)
然后更新[子图](/zh/interface/features/subgraph)中的 **Load Diffusion model** 节点来使用它。
## 图层和输出
图层数量由[子图](/zh/interface/features/subgraph)内 **Empty Qwen Image Layered Latent** 节点上的 `layers` 组件设置。
该模型会在生成图层的同时重新生成完整图像,因此一次生成总是解码出 `layers + 1` 张图像:
| `layers` | 解码出的图像数 | 内容 |
| ---------- | ------- | -------------- |
| `0` | 1 | 仅完整图像 |
| `2`(模板默认值) | 3 | 完整图像,然后是 2 个图层 |
| `5` | 6 | 完整图像,然后是 5 个图层 |
**第一张图像是完整图像,而不是图层。** 在图像转图层的工作流中,它重现的是输入图像,因此当你只需要图层时应将其丢弃。`layers` 可以设为 `0`,此时只会得到这一张图像。
**将所有图层合成回去可以重建完整图像。** 可以用它来检查:如果堆叠图层无法重现第一张图像,说明分解没有达到预期效果。
### 图层如何变成单独的图像
**Empty Qwen Image Layered Latent** 节点会分配一个形状为 `[batch_size, 16, layers + 1, height // 8, width // 8]` 的 5D Latent。图层位于第三个轴上,也就是视频模型用于存放帧的那个时间轴。将 **LatentCutToBatch** 节点的 `dim` 设置为 `t`,会把该轴移动到批次维度上,因此在 **VAE Decode** 之后,每个图层都是批次中一张单独的图像。
因此,图层在堆栈中的位置就是它在批次中的索引,从索引 0 处的完整图像开始计数。这里没有 z-index 字段,也没有承载该顺序的逐图层元数据,因此重新排序或过滤批次就等于重新排序图层。
Qwen-Image-Layered VAE 解码为 4 个通道,因此解码出的图层带有 Alpha 通道。
## 工作流设置
### 采样器设置
该模型运行较慢。原始采样设置为 steps: 50 和 CFG: 4.0,这将至少使生成时间翻倍。
### 输入尺寸
输入尺寸建议使用 640px。如需高分辨率输出,请使用 1024px。
### 提示词(可选)
文本提示词用于描述输入图像的整体内容——包括可能被部分遮挡的元素(例如,你可以指定隐藏在前景物体后面的文字)。它不是用来明确控制各个图层的语义内容的。