Generate videos from text prompts using Wan 2.1.
Open in Comfy Cloud
Download JSON or search "Wan 2.1 Text to Video" in Template Library
### Model Downloads
Diffusion model for Wan2.1 Text-to-Video. Place in ComfyUI/models/diffusion\_models/
> If you need other t2v precision versions, please visit [here](https://huggingface.co/Comfy-Org/Wan_2.1_ComfyUI_repackaged/tree/main/split_files/diffusion_models) to download them.
### Steps to Run
1. Make sure the `Load Diffusion Model` node has loaded the `wan2.1_t2v_1.3B_fp16.safetensors` model
2. Make sure the `Load CLIP` node has loaded the `umt5_xxl_fp8_e4m3fn_scaled.safetensors` model
3. Make sure the `Load VAE` node has loaded the `wan_2.1_vae.safetensors` model
4. (Optional) You can modify the video dimensions in the `EmptyHunyuanLatentVideo` node if needed
5. (Optional) If you need to modify the prompts (positive and negative), make changes in the `CLIP Text Encoder` node at number `5`
6. Click the `Run` button or use the shortcut `Ctrl(cmd) + Enter` to execute the video generation
## Wan2.1 Image-to-Video Workflow (14B)
**Since Wan Video separates the 480P and 720P models**, we'll need to provide examples for both resolutions in this guide. In addition to using different models, they also have slight parameter differences.
### 480P Version
Wan 2.1 Image to Video
Generate videos from images using Wan 2.1.
Open in Comfy Cloud
Download JSON or search "Wan 2.1 Image to Video" in Template Library
**Input materials**
Upload this file to the matching `LoadImage` node:
`LoadImage` node 52 · `image_to_video_wan_start_image.png`
#### Model Downloads
Diffusion model for Wan2.1 I2V 480P. Place in ComfyUI/models/diffusion\_models/
#### Steps to Run
1. Make sure the `Load Diffusion Model` node has loaded the `wan2.1_i2v_480p_14B_fp16.safetensors` model
2. Make sure the `Load CLIP` node has loaded the `umt5_xxl_fp8_e4m3fn_scaled.safetensors` model
3. Make sure the `Load VAE` node has loaded the `wan_2.1_vae.safetensors` model
4. Make sure the `Load CLIP Vision` node has loaded the `clip_vision_h.safetensors` model
5. Upload the provided input image in the `Load Image` node
6. (Optional) Enter the video description content you want to generate in the `CLIP Text Encoder` node
7. (Optional) You can modify the video dimensions in the `WanImageToVideo` node if needed
8. Click the `Run` button or use the shortcut `Ctrl(cmd) + Enter` to execute the video generation
### 720P Version

Open in Comfy Cloud
Download the workflow image and drag it into ComfyUI to load the workflow
Download the default input image, or use your own image.
#### Model Downloads
Diffusion model for Wan2.1 I2V 720P. Place in ComfyUI/models/diffusion\_models/
#### Steps to Run
1. Make sure the `Load Diffusion Model` node has loaded the `wan2.1_i2v_720p_14B_fp16.safetensors` model
2. Make sure the `Load CLIP` node has loaded the `umt5_xxl_fp8_e4m3fn_scaled.safetensors` model
3. Make sure the `Load VAE` node has loaded the `wan_2.1_vae.safetensors` model
4. Make sure the `Load CLIP Vision` node has loaded the `clip_vision_h.safetensors` model
5. Upload the provided input image in the `Load Image` node
6. (Optional) Enter the video description content you want to generate in the `CLIP Text Encoder` node
7. (Optional) You can modify the video dimensions in the `WanImageToVideo` node if needed
8. Click the `Run` button or use the shortcut `Ctrl(cmd) + Enter` to execute the video generation


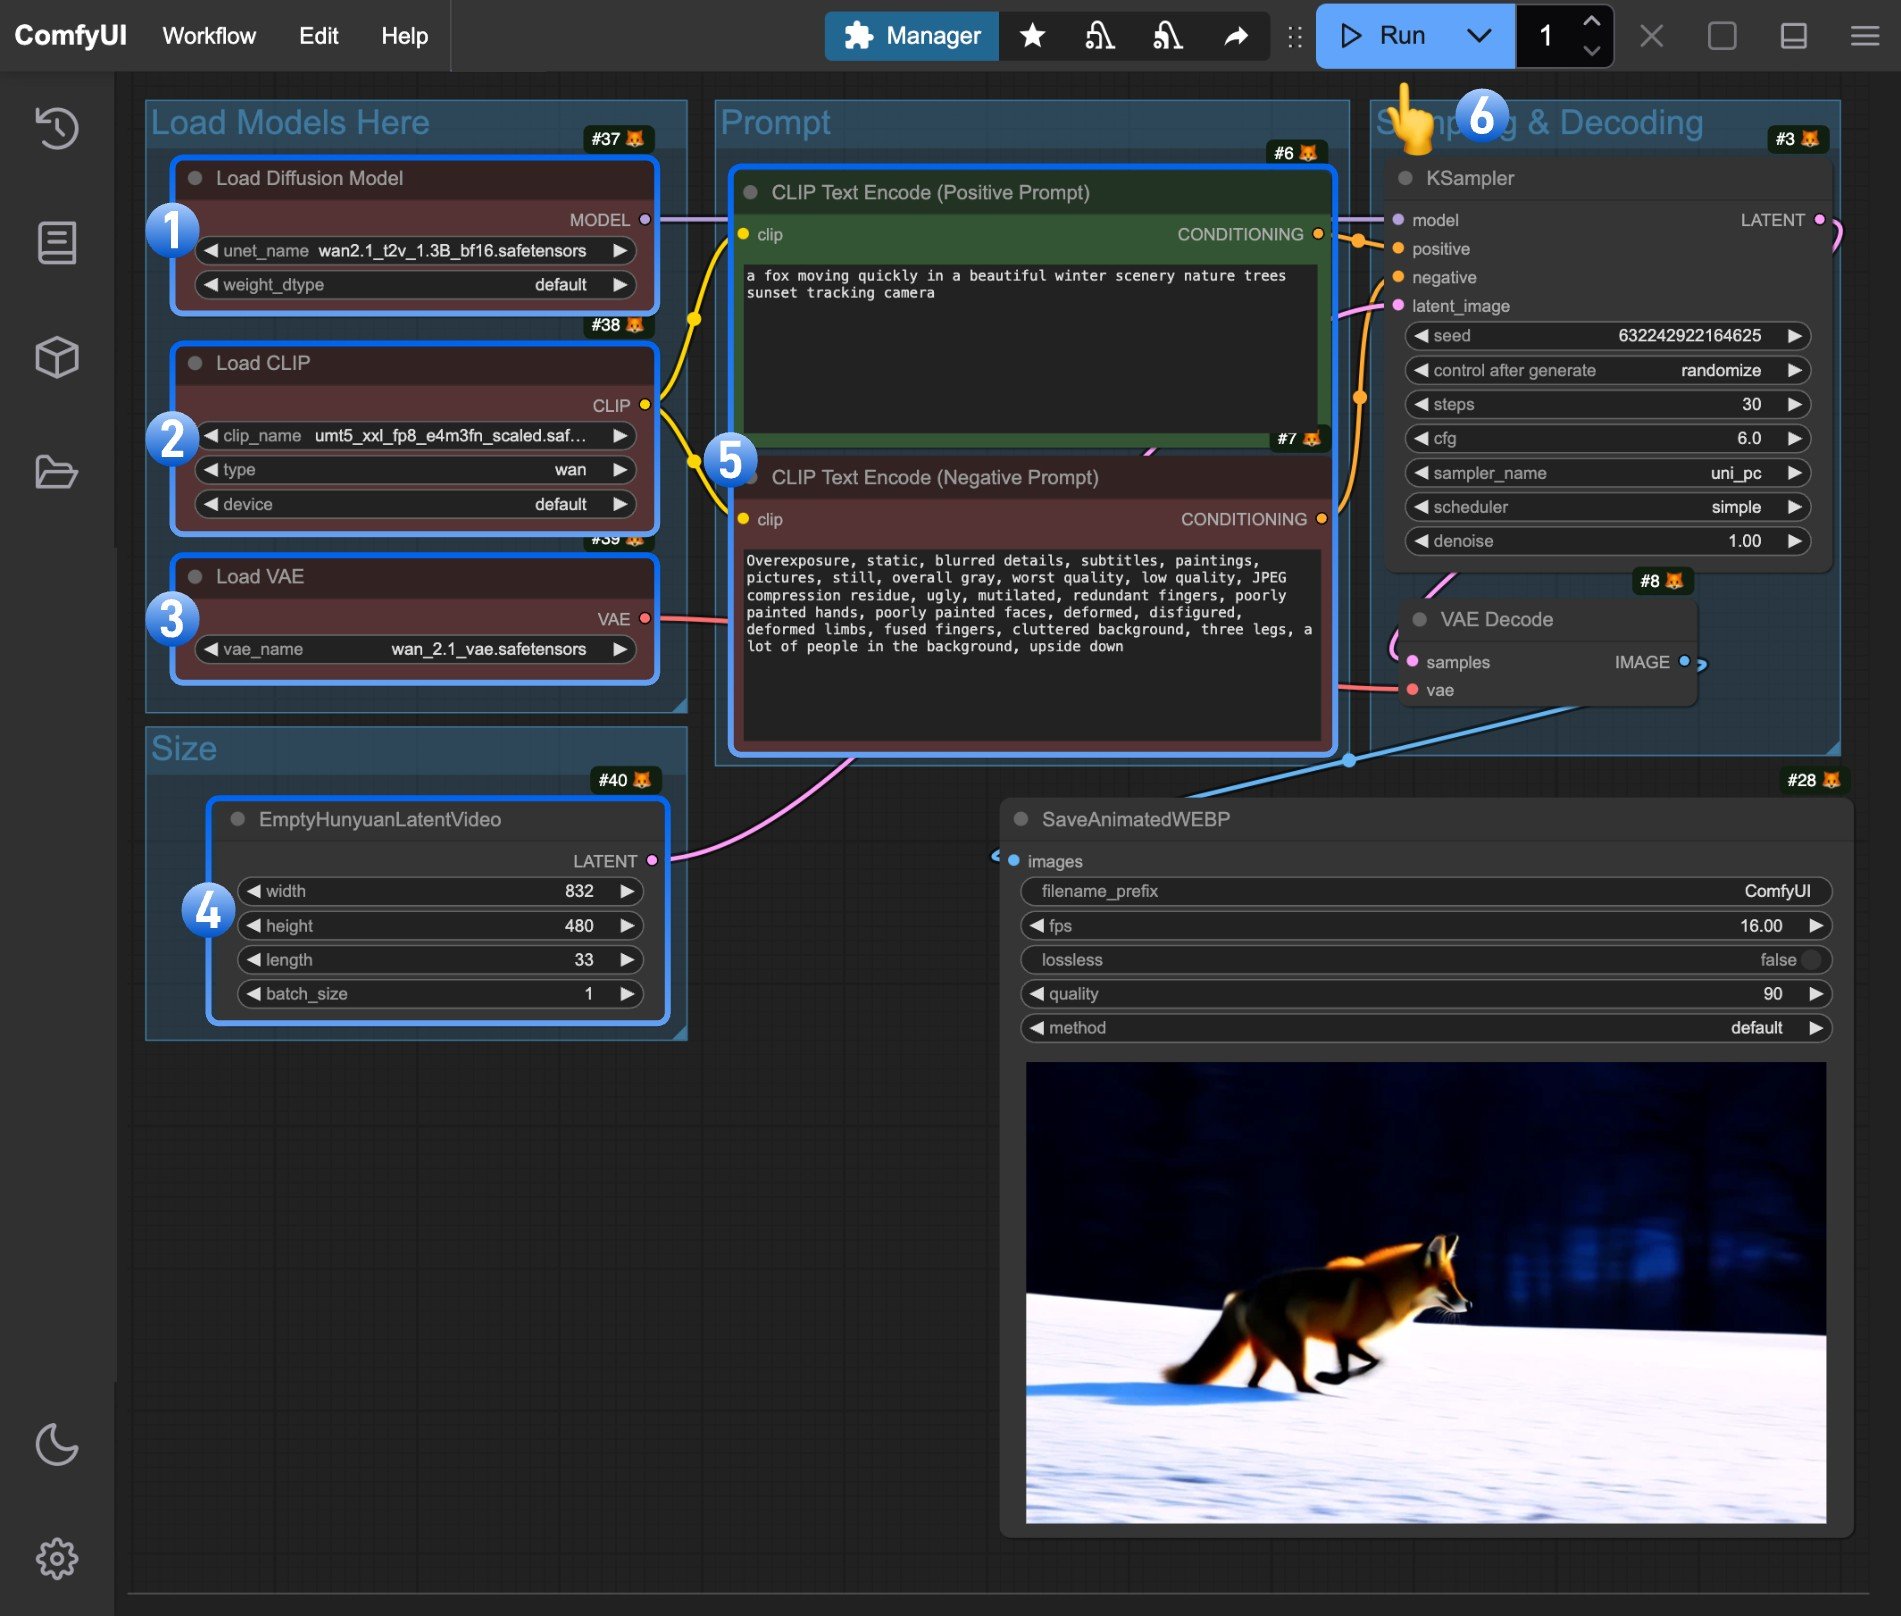 1. Make sure the `Load Diffusion Model` node has loaded the `wan2.1_t2v_1.3B_fp16.safetensors` model
2. Make sure the `Load CLIP` node has loaded the `umt5_xxl_fp8_e4m3fn_scaled.safetensors` model
3. Make sure the `Load VAE` node has loaded the `wan_2.1_vae.safetensors` model
4. (Optional) You can modify the video dimensions in the `EmptyHunyuanLatentVideo` node if needed
5. (Optional) If you need to modify the prompts (positive and negative), make changes in the `CLIP Text Encoder` node at number `5`
6. Click the `Run` button or use the shortcut `Ctrl(cmd) + Enter` to execute the video generation
## Wan2.1 Image-to-Video Workflow (14B)
**Since Wan Video separates the 480P and 720P models**, we'll need to provide examples for both resolutions in this guide. In addition to using different models, they also have slight parameter differences.
### 480P Version
1. Make sure the `Load Diffusion Model` node has loaded the `wan2.1_t2v_1.3B_fp16.safetensors` model
2. Make sure the `Load CLIP` node has loaded the `umt5_xxl_fp8_e4m3fn_scaled.safetensors` model
3. Make sure the `Load VAE` node has loaded the `wan_2.1_vae.safetensors` model
4. (Optional) You can modify the video dimensions in the `EmptyHunyuanLatentVideo` node if needed
5. (Optional) If you need to modify the prompts (positive and negative), make changes in the `CLIP Text Encoder` node at number `5`
6. Click the `Run` button or use the shortcut `Ctrl(cmd) + Enter` to execute the video generation
## Wan2.1 Image-to-Video Workflow (14B)
**Since Wan Video separates the 480P and 720P models**, we'll need to provide examples for both resolutions in this guide. In addition to using different models, they also have slight parameter differences.
### 480P Version

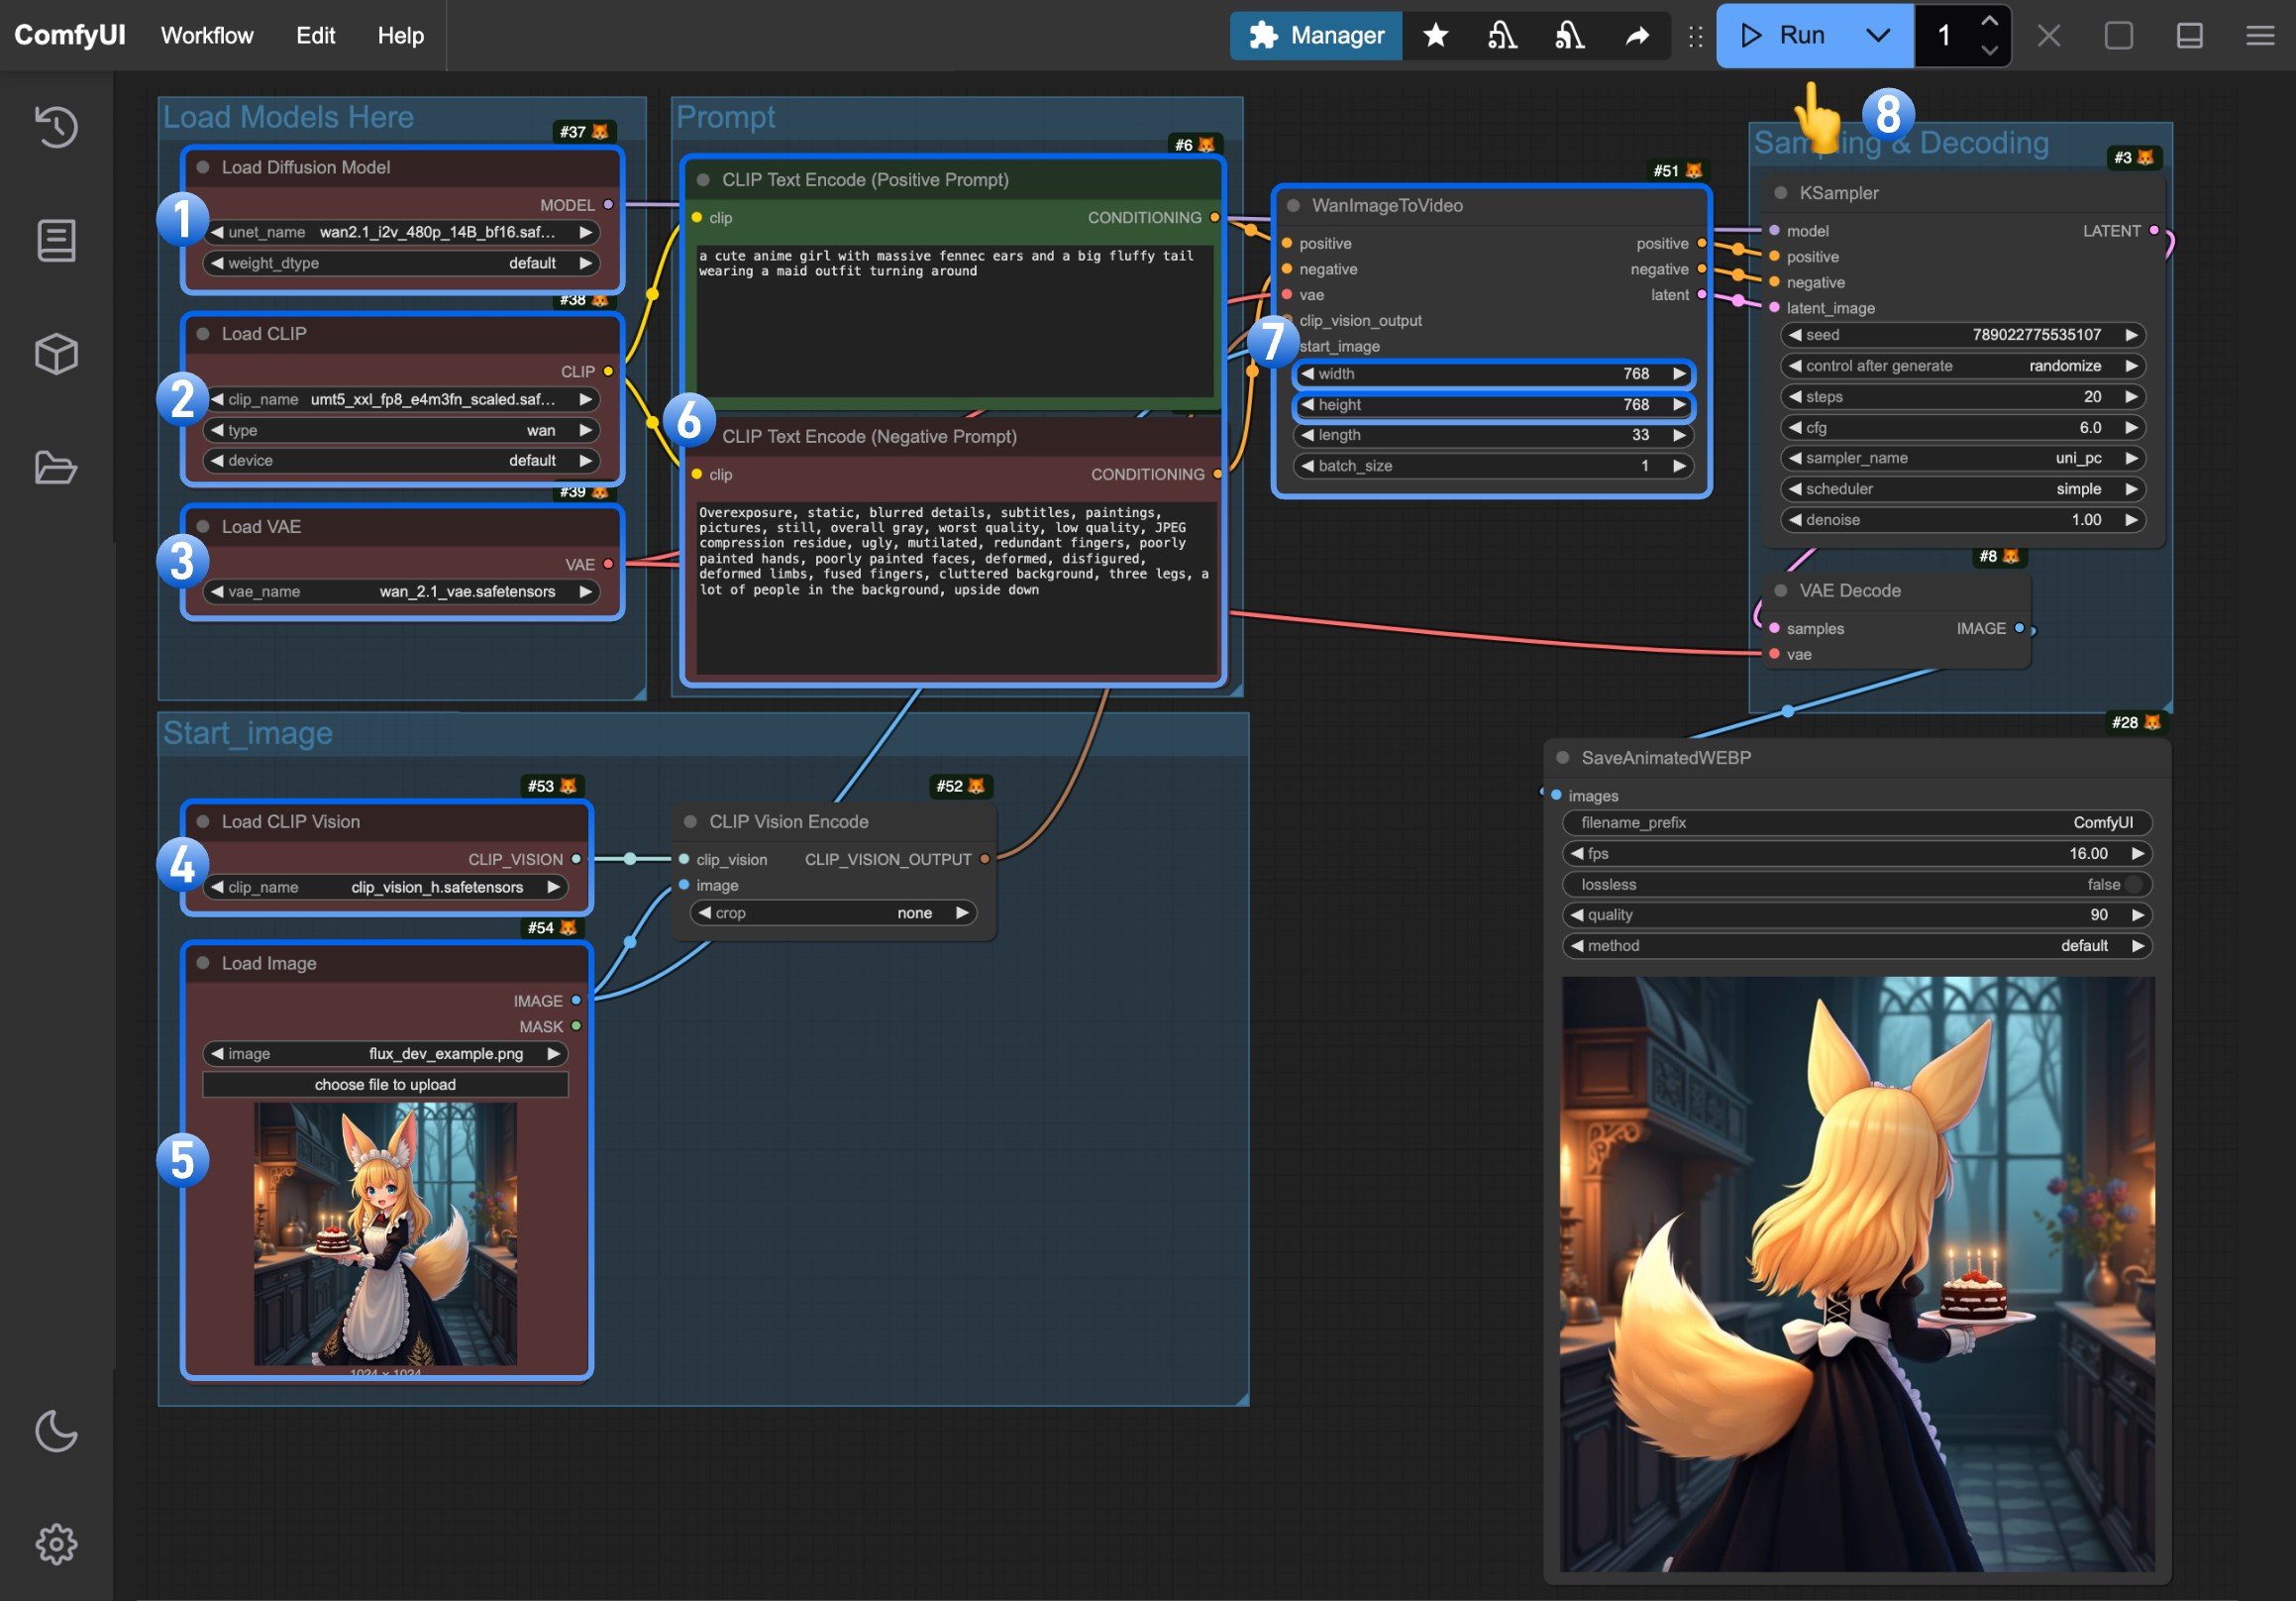 1. Make sure the `Load Diffusion Model` node has loaded the `wan2.1_i2v_480p_14B_fp16.safetensors` model
2. Make sure the `Load CLIP` node has loaded the `umt5_xxl_fp8_e4m3fn_scaled.safetensors` model
3. Make sure the `Load VAE` node has loaded the `wan_2.1_vae.safetensors` model
4. Make sure the `Load CLIP Vision` node has loaded the `clip_vision_h.safetensors` model
5. Upload the provided input image in the `Load Image` node
6. (Optional) Enter the video description content you want to generate in the `CLIP Text Encoder` node
7. (Optional) You can modify the video dimensions in the `WanImageToVideo` node if needed
8. Click the `Run` button or use the shortcut `Ctrl(cmd) + Enter` to execute the video generation
### 720P Version

1. Make sure the `Load Diffusion Model` node has loaded the `wan2.1_i2v_480p_14B_fp16.safetensors` model
2. Make sure the `Load CLIP` node has loaded the `umt5_xxl_fp8_e4m3fn_scaled.safetensors` model
3. Make sure the `Load VAE` node has loaded the `wan_2.1_vae.safetensors` model
4. Make sure the `Load CLIP Vision` node has loaded the `clip_vision_h.safetensors` model
5. Upload the provided input image in the `Load Image` node
6. (Optional) Enter the video description content you want to generate in the `CLIP Text Encoder` node
7. (Optional) You can modify the video dimensions in the `WanImageToVideo` node if needed
8. Click the `Run` button or use the shortcut `Ctrl(cmd) + Enter` to execute the video generation
### 720P Version

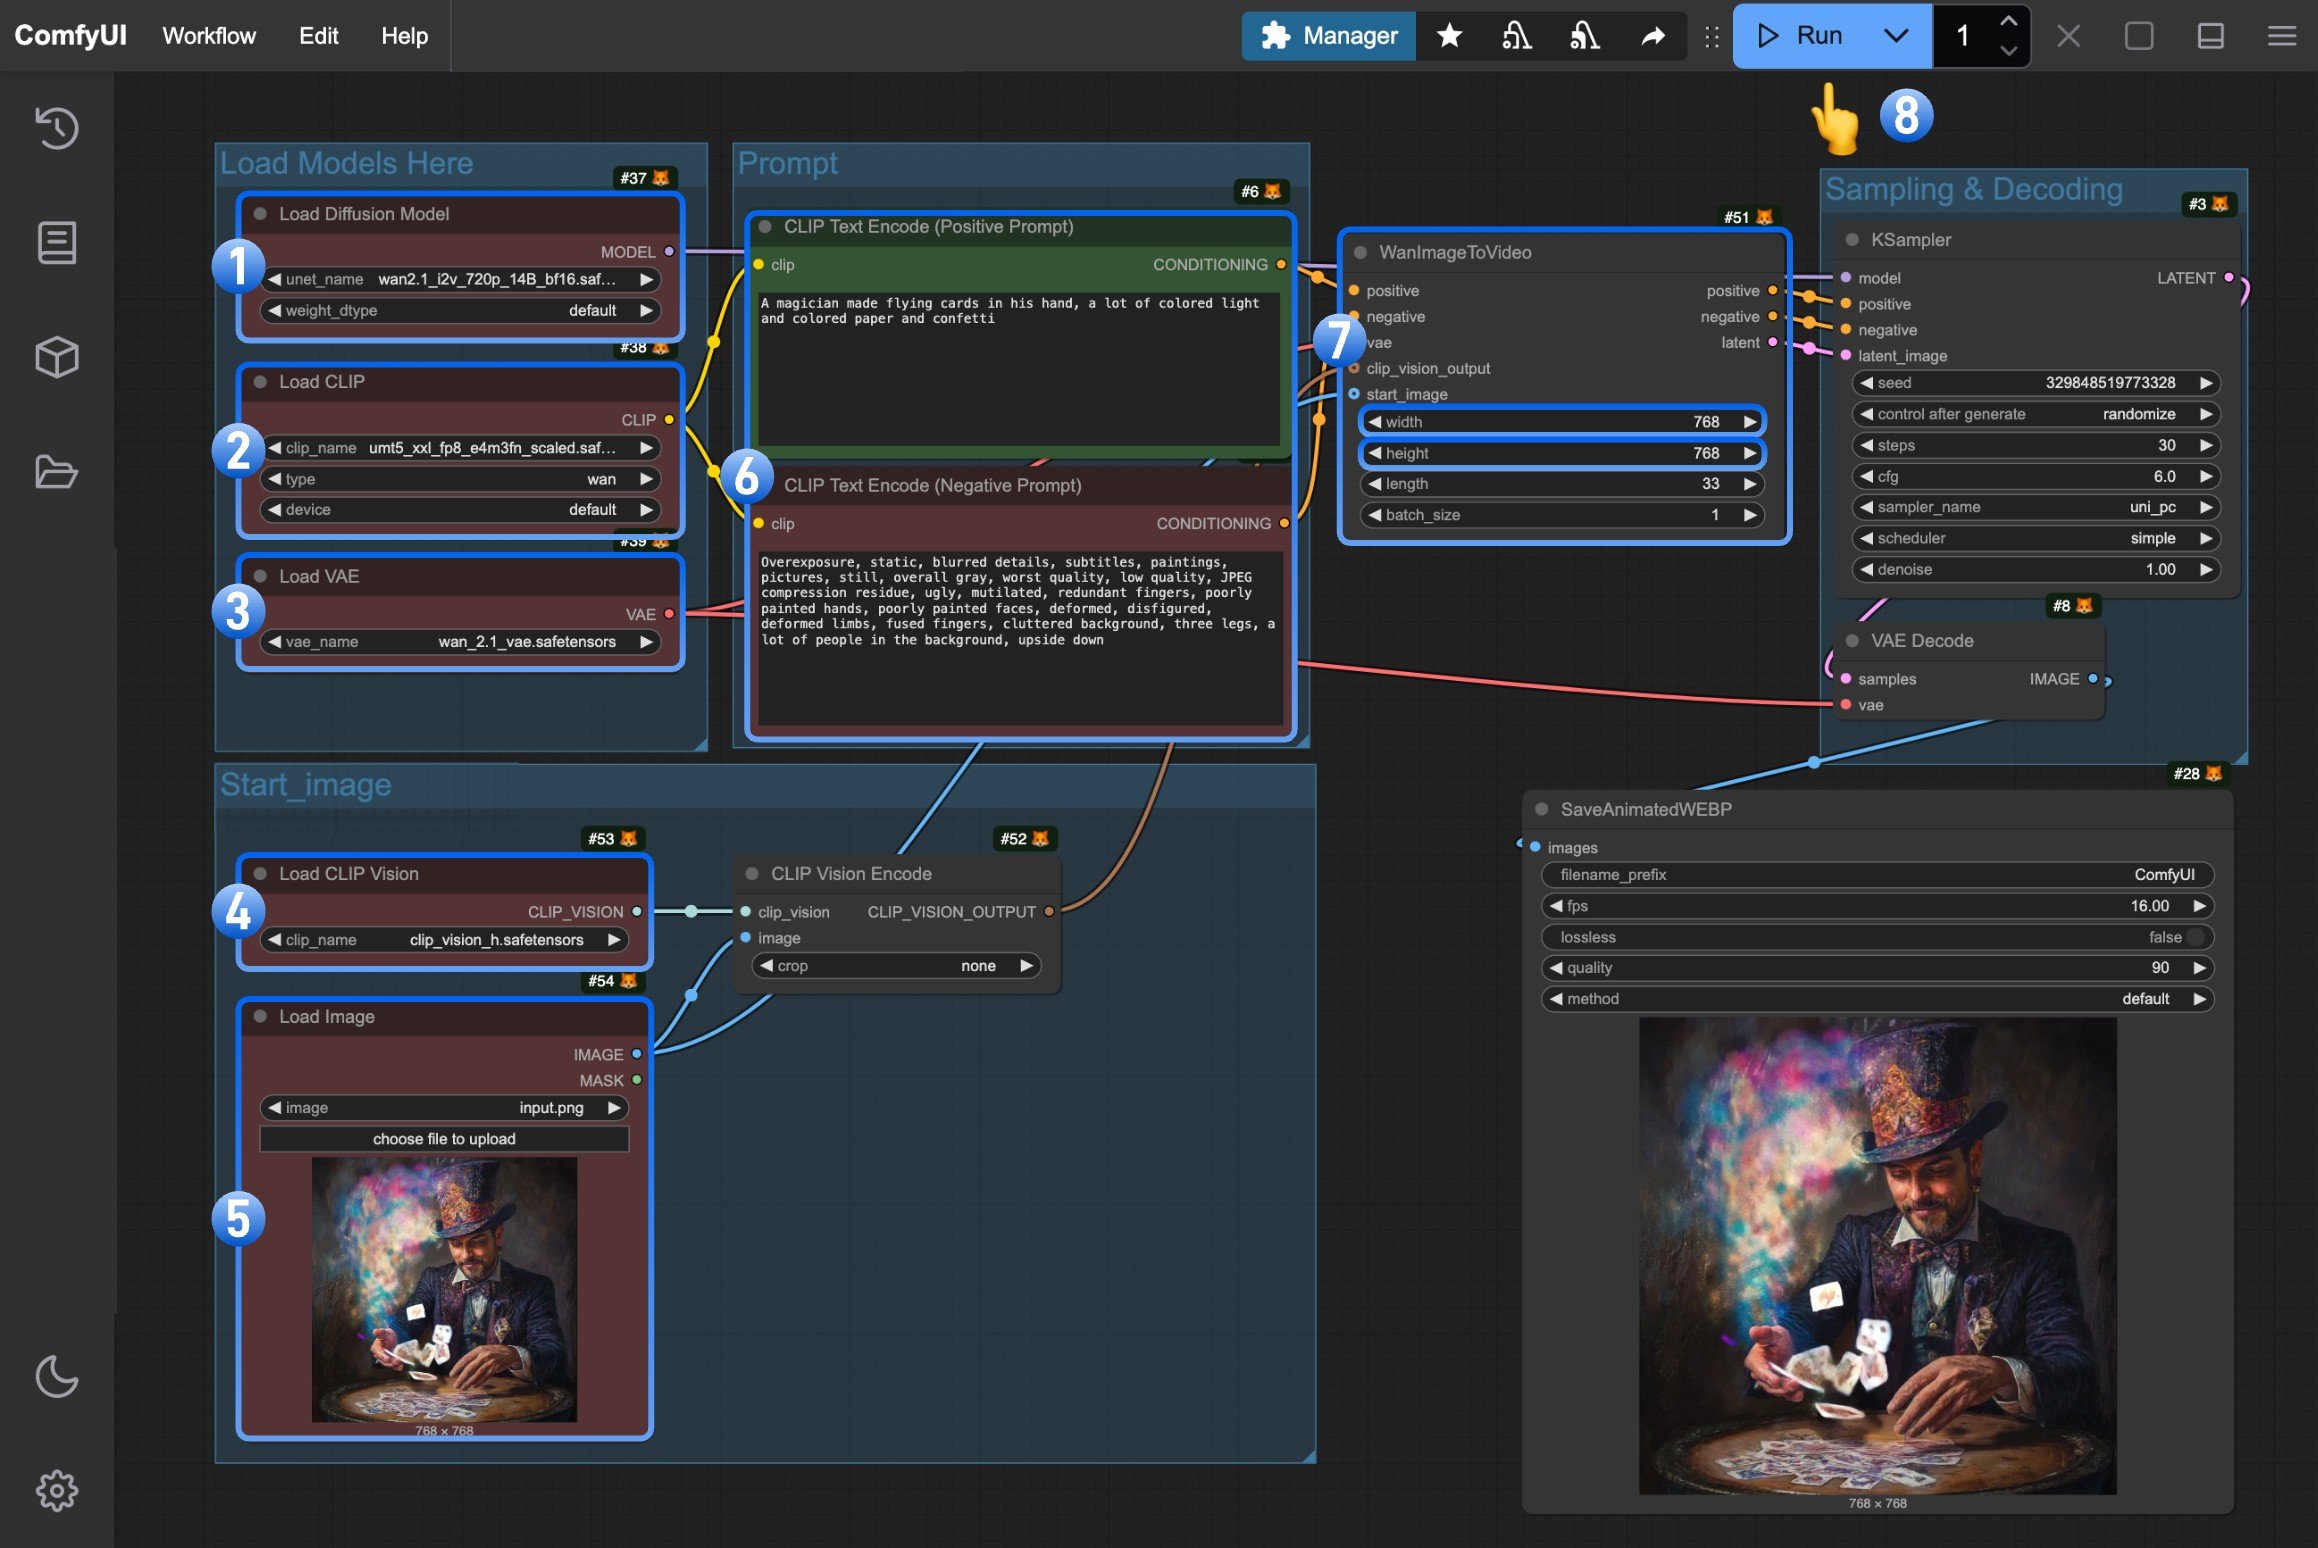 1. Make sure the `Load Diffusion Model` node has loaded the `wan2.1_i2v_720p_14B_fp16.safetensors` model
2. Make sure the `Load CLIP` node has loaded the `umt5_xxl_fp8_e4m3fn_scaled.safetensors` model
3. Make sure the `Load VAE` node has loaded the `wan_2.1_vae.safetensors` model
4. Make sure the `Load CLIP Vision` node has loaded the `clip_vision_h.safetensors` model
5. Upload the provided input image in the `Load Image` node
6. (Optional) Enter the video description content you want to generate in the `CLIP Text Encoder` node
7. (Optional) You can modify the video dimensions in the `WanImageToVideo` node if needed
8. Click the `Run` button or use the shortcut `Ctrl(cmd) + Enter` to execute the video generation
1. Make sure the `Load Diffusion Model` node has loaded the `wan2.1_i2v_720p_14B_fp16.safetensors` model
2. Make sure the `Load CLIP` node has loaded the `umt5_xxl_fp8_e4m3fn_scaled.safetensors` model
3. Make sure the `Load VAE` node has loaded the `wan_2.1_vae.safetensors` model
4. Make sure the `Load CLIP Vision` node has loaded the `clip_vision_h.safetensors` model
5. Upload the provided input image in the `Load Image` node
6. (Optional) Enter the video description content you want to generate in the `CLIP Text Encoder` node
7. (Optional) You can modify the video dimensions in the `WanImageToVideo` node if needed
8. Click the `Run` button or use the shortcut `Ctrl(cmd) + Enter` to execute the video generation